
February 2020
This first session about Docker will help you getting started. It will focus on using Docker’s command line API without writing Dockerfiles; this will be covered in the next session.
After having checked your Docker installation, we will cover the following aspects:
All actions you need to perform are indicated by the following pictogram:
Make sure you read and understand all the material of this document, and go through all the required actions.
Also, be sure to keep notes about what you are doing, as you will have to answer graded questions about your work during the last 15 minutes of the session.
docker group.-a in usermod -a -G docker $USER.docker group with newgrp docker.Up to now, being able to use Docker required to have root-equivalent powers on the host machine.
This is the reason the Docker-capable images used at school are restricted, and may not mount your AFS automatically.
Run the following command in a terminal to get information about your Docker installation:
$ docker infoYou are now ready to run your first test.
Run the following command in a terminal.
$ docker run hello-worldIt should run a container based on the official Hello World image and display a list of the actions which were performed by the different components Docker relies on.
Write down what are the 4 software components from Docker involved in the previous step.
Now use the docker help and the docker inspect commands to:
hello-world image;hello file using the file utility.The hello-world image is minimal in the sense in does not contain any useless bit.
Eventually analyse this file, thing about where it could be run, and write down what this teaches us about:
We will now use the busybox image to perform some experiments on containers.
busybox is the name of a special program containing essential Linux tools like ls, du, cp, rm, etc. It is commonly used to create minimal Linux systems like Alpine Linux (which is often used as a base image for containers).
Because everyone can push images to the Docker Hub, we first want to make sure we are not pulling an evil image.
Using the docker search command, find the official busybox image.
Pull the image manually (we will later see this is optional) and check it is available locally using two subcommands of docker image.
Using the docker container create command, you can create a plain new container based on a given image.
Create a container with some name like “bb1”. Because the busybox image starts a shell as default command, it will fail to start in the next step if we do not allocate a pseudo-TTY and keep STDIN open even if not attached. You will need to find the two options required to achieve this.
You can check the status of the container using the docker container ls command. You will have to find the right parameters because be default ls displays only running containers.
At this point, Docker is aware of the security configuration (cgroups parameters) of the container to launch.
You can now start your container using the appropriate docker container subcommand.
Now control groups (cgroups) are effectively created for your container. It is possible to manually inspect cgroup configurations and get statics using the cgroup filesystem which should be mounted under /sys/fs/cgroup.
In particular, if we want to get the list of (host) PIDs of the processes running inside the container, we can display the content of:
/sys/fs/cgroup/memory/docker/$CONTAINERID/tasksOr, if we want to get some statistics about the memory consumption of a container, we can use:
/sys/fs/cgroup/memory/docker/$CONTAINERID/memory.statIt is time to actually use the shell running inside our container.
Use the appropriate docker container subcommand to attach local standard input, output, and error streams to your running container.
You can now use this new shell to navigate your container’s own filesystem.
Under which user id are you logged into the container?
We can run several programs concurrently within a same container. They will share the same confinement policy and the same filesystem.
Use the following command to start another shell with the same container. Make sure you understand the parameters used.
docker container exec -i -t bb1 shYou now have two shells in the same container.
Check how many containers are running by using docker container ls.
Check how many programs are running inside your container using docker container top.
Now try the following combinations to determine when the container will stop:
Write down the states a container can be in. Can you draw the possible transitions between those states?
runYou can also use the docker [container] run which combines the options of create, start and attach. Note that this will not allow you to run more than one command in the same container.
Try to run another container using this command.
OK, you nearly completed the first step!
Before starting step 2, make sure you stop and remove all your containers. You can use the following commands:
# list running containers and kill them
docker container ls -q | xargs docker container kill

# remove all containers without confirmation
docker container prune -f

# Alternatively:
docker system pruneWe will now focus on understanding the difference between containers and images, and how to manage each of those.
Remember that:
Check the size of the busybox image using a docker image subcommand.
List the running containers using a docker container subcommand.
If you still have a shell active in your busybox-based container, then you should see an active container.
If you previously started several containers, they should still be active and waiting for a relaunch. This is because they are not destroyed when the last command of the container exits, unless you explicitly require this to happen when you define the container (when using docker container create or docker container run) using the --rm switch.
Now list all containers (active and stopped) which still are available.
The output of this listing contains important information. Here is the meaning of each column:
cool_panda”) if you did not supply one, or the name you define using --name $SOMENAME passed to docker container create or docker container run.
Let’s first try to remove the hello-world image. Use the appropriate docker image subcommand to try to remove it.
What happens?
Now try to remove all the container you created, and check there is now more running after this.
Finally, remove all the images you pulled locally to free some disk space.
In this step you will learn how to create files, loose them, and (maybe) find them again.
Docker’s container model enables to store files at many different places:

First, let’s start by trying a handful of cases to understand how data is stored in a simple container.
Make sure you remove all containers after each step to avoid strange behaviors.
Using the busybox image, try the following scenarios:
Run a first unnamed container and create a file “/test1”.
Stop the container and re-run the command you previously typed.
Try to access “/test1”.
What happens?
Run a first container named “cont1”, create a file “/test1”.
Run another shell inside the same container, check the file exists.
Run a first container named “cont1”, create a file “/test2”.
Exit the container, and try to re-run the same docker run command.
What happens?
Run a first container named “cont1”, create a file “/test3”.
Run a second container named “cont2” from the same base image.
Does “/test3” exists?
Run a first container named “cont1”, create a file “/test4”.
Exit the container and restart, reattach the shell inside the container.
Does “/test4” exists?
Run a first container named “cont1” with the --rm option, create a file “/test5”.
Exit the container and restart, reattach the shell inside the container.
What happens?
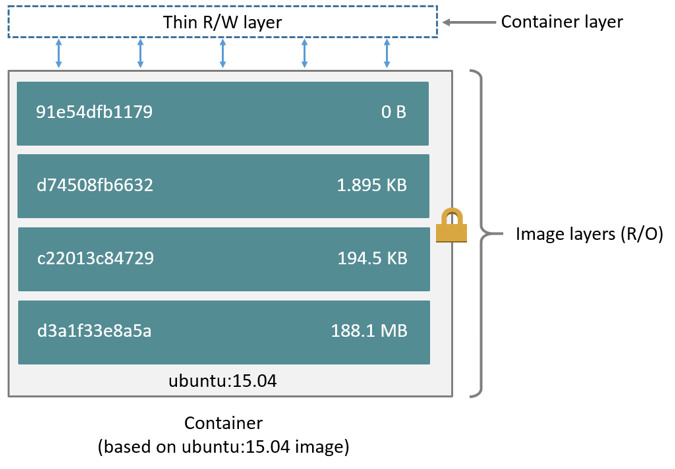
In the first step, we inspected (using docker inspect) the hello-world image to get more information about the hello program. If we use the default “overlay2” storage driver, then the files for each container are stored under /var/lib/docker/overlay2/, under sub-directories named according to container ids.
Bind mounts are a very simple way to share files between the host system and a container. This is a pattern commonly used to run build tools within Docker image on files from the host system. It can also be used to share some files between containers.
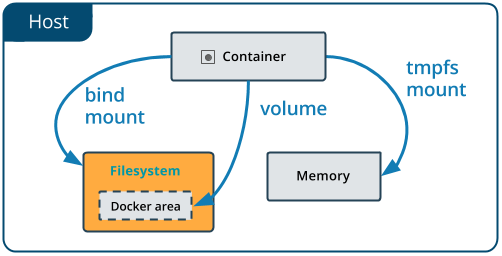
In what follows, we will use the --mount parameter of the run command to attach or create various storage spaces mounted inside our container’s filesystem. While it is also possible to use the more concise -v or --volume parameter, its syntax is less readable for beginners and we advise you to learn it later. The only difference between the two is that the --volume parameter can create directories or files on the host filesystem (which is usually not desirable) while the --mount prevents you from doing so. Furthermore, --mount is the official recommended way.
The complete documentation about those commands is available at the official documentation website.
Prepare temporary storage directory at /tmp/testbm.
Using the busybox image, try the following scenarios:
Run a first container with the --rm option and use the --mount parameter to create a bindmount from /tmp/testbm to /host.
Create a file (from the host or the container) and check you can read it from the other side.
Run a first container with the --rm option and use the --mount parameter to create a bindmount from /tmp/testbm to /host.
Run a second container with the same options and make sure you can read and write files under “/host” from both sides.
The purpose of Docker “volumes” is to provide a standardized way to handle the previous pattern with shareable directories created on-demand or prior to container launch. They are managed by the Docker daemon, and can have more features thanks to volume drivers (to share files between containers on different machines, typically).
There are two ways to create volumes from the command line (and one from Dockerfiles as we will see in the next session):
docker volume subcommands. This is just a convenience to give understandable names to volumes and facilitate their management.(how to create volumes? explicitly using docker volume create or implicitly using the run command and --volume without host binds?)
As it is simpler to start with named volumes, we will focus on them first.
Using docker volume subcommands, create a volume named vol1 and check where its data will actually be stored.
Now create two simple containers which mount this volume under the “/storage” mountpoint, and make sure they can both access the same files.
Using docker system subcommands, check the size of the volume vol1.
Now remove all containers and volumes.
Anonymous volumes are created when the source parameter of the --mount option is left empty. Nothing special here: it just triggers the creation of a new volume with random name.
Create an anonymous volume using a custom docker run command and create a test file in it.
Find the name of this new volume and verify its files are stored at the same location as the named volumes.
Such volumes are useful to recover data even after container removal, but it can be challenging to find the right volume if we launched many containers with anonymous volumes…
A last useful trick is to launch a container with all the volumes from another one. This makes easy to debug database systems for instance, where the image is trimmed down to a bare minimum without exploit-friendly tools like shells. Using this technique, a container can use the same mount points as another one (running or exited) with all the necessary tools to perform a diagnosis.
Let us just try this feature quickly: run a first container with a named volume, then run a second using the --volumes-from parameter. Giving a name to your first container will make things easier.
Temporary filesystems are in-memory filesystems which enable fast operations on small files. They are cleared upon container exit, no matter whether the container survives or not. Beside their speed, another advantage of this kind of storage is that its size can be easily be capped.
Launch a container with a temporary filesystem. In the --mount parameter, use the tmpfs-size option to limit the size to something really small (a hundred of bytes), then write many lines in a test file using something like that:
# In the container
$ for i in $(seq 2000); do echo $i >> /tmpfs/test; done
What happens?
Exit the previous container (do not remove it) and try to restart the same container (and reattach your console to the shell running in it) to check what happened to our test file.
Does the TMPFS volume survive container exit?
Finally, the very last way to store information is to commit changes made to the thin storage layer of a container to a new image. This will create a new image container another layer on top.
Start a new container and create a simple test file at the root of its filesystem, with something like:
docker run -it --name cont1 busybox sh -c 'echo hello > testfile'then use docker container commit to create another image containing those changes, and create another container based on this image.
Make sure the changes are here.
How many layers does the new image have?