This section describes how to install various contrib modules in the Condor system. Some of these modules are separate, optional pieces, not included in the main distribution of Condor. Examples are the checkpoint server and DAGMan. Others are integral parts of Condor taken from the development series that have certain features users might want to install. Examples are the new SMP-aware condor_ startd and the CondorView collector. Both of these modules come with Condor version 6.1 and later versions. However, these separate modules may be installed, maintaining most of the stable release, while not switching over to using the development binaries.
The CondorView Client Contrib module is used to automatically generate
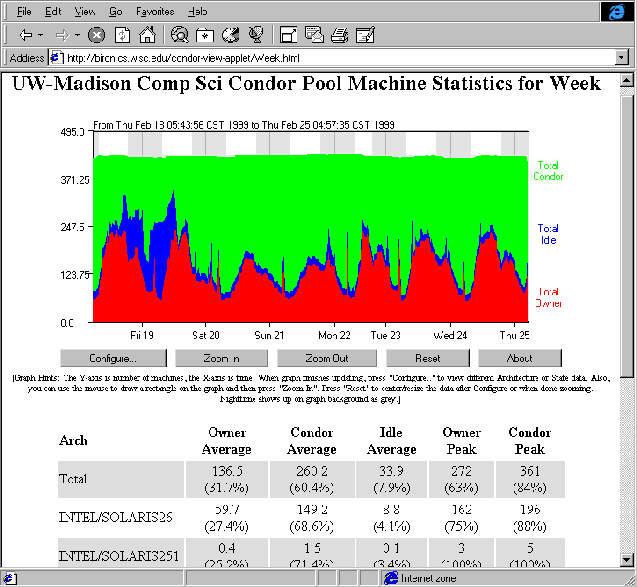
World Wide Web pages to display usage statistics of a Condor
pool.
Included in the module is a shell script which invokes the condor_ stats
command to retrieve pool usage statistics from the CondorView server and
generate HTML pages from the results.
Also included is a Java applet which graphically visualizes Condor
usage information.
Users can interact with the applet to customize the visualization and to
zoom in to a specific time frame.
Figure 3.2 on page ![[*]](crossref.png) is a screen shot of a web page created by CondorView.
To get a further feel for what pages generated by CondorView look like,
view the statistics for the University of Wisconsin-Madison pool
by visiting the URL http://www.cs.wisc.edu/condor
and clicking on
Condor View.
is a screen shot of a web page created by CondorView.
To get a further feel for what pages generated by CondorView look like,
view the statistics for the University of Wisconsin-Madison pool
by visiting the URL http://www.cs.wisc.edu/condor
and clicking on
Condor View.
After unpacking and installing the CondorView Client, a script named make_stats can be invoked to create HTML pages displaying Condor usage for the past hour, day, week, or month. By using the Unix cron facility to periodically execute make_stats, Condor pool usage statistics can be kept up to date automatically. This simple model allows the CondorView Client to be easily installed; no Web server CGI interface is needed.
    POOL_HISTORY_DIR = /full/path/to/directory/to/store/historical/data
    KEEP_POOL_HISTORY = True
For full details on these and other condor_ collector configuration file
entries, see section 3.3.15 on
page .
PATH=/bin:/usr/bin:$STATSDIR:/usr/local/bin
./make_stats setup
Open the file index.html to verify that things look good.
crontab cronentries
The Checkpoint Server maintains a repository for checkpoint files. Using checkpoint servers reduces the disk requirements of submitting machines in the pool, since the submitting machines no longer need to store checkpoint files locally. Checkpoint server machines should have a large amount of disk space available, and they should have a fast connection to machines in the Condor pool.
If your spool directories are on a network file system, then checkpoint files will make two trips over the network: one between the submitting machine and the execution machine, and a second between the submitting machine and the network file server. If you install a checkpoint server and configure it to use the server's local disk, the checkpoint will travel only once over the network, between the execution machine and the checkpoint server. You may also obtain checkpointing network performance benefits by using multiple checkpoint servers, as discussed below.
NOTE: It is a good idea to pick very stable machines for your checkpoint servers. If individual checkpoint servers crash, the Condor system will continue to operate, although poorly. While the Condor system will recover from a checkpoint server crash as best it can, there are two problems that can (and will) occur:
for details).
This parameter represents the maximum amount of CPU time you are
willing to discard by starting a job over from scratch if the
checkpoint server is not responding to requests.
The location of checkpoints changes upon the installation
of a checkpoint server.
A configuration change would cause
currently queued jobs with checkpoints
to not be able to find their checkpoints.
This results in the jobs with checkpoints
remaining indefinitely queued (never running)
due to the lack of finding their checkpoints.
It is therefore best to
either remove jobs from the queues or let them complete
before installing a checkpoint server.
It is advisable to shut your pool down before doing any
maintenance on your checkpoint server.
See section 3.9 on
page for details on shutting
down your pool.
A graduated installation of the checkpoint server may be accomplished by configuring submit machines as their queues empty.
To install a checkpoint server, download the appropriate binary contrib module for the platform(s) on which your server will run. Uncompress and untar the file to result in a directory that contains a README, ckpt_server.tar, and so on. The file ckpt_server.tar acts much like the release.tar file from a main release. This archive contains the files:
        sbin/condor_ckpt_server
        sbin/condor_cleanckpts
        etc/examples/condor_config.local.ckpt.server
These new files are not found in the main release, so you can
safely untar the archive directly into your existing release
directory.
condor_ ckpt_server is the checkpoint server binary.
condor_ cleanckpts is a script that can be periodically run to
remove stale checkpoint files from your server.
The checkpoint server normally cleans all old files itself.
However, in certain error situations, stale files can be left that are
no longer needed.
You may set up a cron job that calls
condor_ cleanckpts every week or so to automate the cleaning up
of any
stale files.
The example configuration file give with the module
is described below.
After unpacking the module, there are three steps to complete. Each is discussed in its own section:
Place settings in the local configuration file of the checkpoint server. The file etc/examples/condor_config.local.ckpt.server contains the needed settings. Insert these into the local configuration file of your checkpoint server machine.
The CKPT_SERVER_DIR must be customized. The CKPT_SERVER_DIR attribute defines where your checkpoint files are to be located. It is better if this is on a very fast local file system (preferably a RAID). The speed of this file system will have a direct impact on the speed at which your checkpoint files can be retrieved from the remote machines.
The other optional settings are:
The rest of these settings are the checkpoint server-specific versions
of the Condor logging entries, as described in
section 3.3.3 on
page .
To start the newly configured checkpoint server,
restart Condor on that host to enable
the condor_ master to notice the new configuration.
Do this by sending a condor_ restart command from any machine
with administrator access to your pool.
See section 3.7.5 on
page for full details about IP/host-based
security in Condor.
After the checkpoint server is running, you change a few settings in your configuration files to let your pool know about your new server:
It is most convenient to set these parameters in your global configuration file, so they affect all submission machines. However, you may configure each submission machine separately (using local configuration files) if you do not want all of your submission machines to start using the checkpoint server at one time. If USE_CKPT_SERVER is set to FALSE, the submission machine will not use a checkpoint server.
Once these settings are in place, send a
condor_ reconfig to all machines in your pool so the changes take
effect.
This is described in section 3.9.2 on
page .
It is possible to configure a Condor pool to use multiple checkpoint servers. The deployment of checkpoint servers across the network improves checkpointing performance. In this case, Condor machines are configured to checkpoint to the nearest checkpoint server. There are two main performance benefits to deploying multiple checkpoint servers:
Once you have multiple checkpoint servers running in your pool, the following configuration changes are required to make them active.
First, USE_CKPT_SERVER should be set to TRUE (the default) on all
submitting machines where Condor jobs should use a checkpoint server.
Additionally, STARTER_CHOOSES_CKPT_SERVER should be set to
TRUE (the default) on these submitting machines.
When TRUE, this parameter specifies that the checkpoint server
specified by the machine running the job should be used instead of the
checkpoint server specified by the submitting machine.
See section 3.3.6 on
page for more
details.
This allows the job to use the checkpoint server closest to the
machine on which it is running, instead of the server closest to the
submitting machine.
For convenience, set these parameters in the
global configuration file.
Second, set CKPT_SERVER_HOST on each machine. As described, this is set to the full hostname of the checkpoint server machine. In the case of multiple checkpoint servers, set this in the local configuraton file. It is the hostname of the nearest server to the machine.
Third, send a
condor_ reconfig to all machines in the pool so the changes take
effect.
This is described in section 3.9.2 on
page .
After completing these three steps, the jobs in your pool will send checkpoints to the nearest checkpoint server. On restart, a job will remember where its checkpoint was stored and get it from the appropriate server. After a job successfully writes a checkpoint to a new server, it will remove any previous checkpoints left on other servers.
NOTE: If the configured checkpoint server is unavailable, the job will keep trying to contact that server as described above. It will not use alternate checkpoint servers. This may change in future versions of Condor.
The configuration described in the previous section ensures that jobs will always write checkpoints to their nearest checkpoint server. In some circumstances, it is also useful to configure Condor to localize checkpoint read transfers, which occur when the job restarts from its last checkpoint on a new machine. To localize these transfers, we want to schedule the job on a machine which is near the checkpoint server on which the job's checkpoint is stored.
We can say that all of the machines configured to use checkpoint server ``A'' are in ``checkpoint server domain A.'' To localize checkpoint transfers, we want jobs which run on machines in a given checkpoint server domain to continue running on machines in that domain, transferring checkpoint files in a single local area of the network. There are two possible configurations which specify what a job should do when there are no available machines in its checkpoint server domain:
The first step in implementing checkpoint server domains is to include the name of the nearest checkpoint server in the machine ClassAd, so this information can be used in job scheduling decisions. To do this, add the following configuration to each machine:
  CkptServer = "$(CKPT_SERVER_HOST)"
  STARTD_EXPRS = $(STARTD_EXPRS), CkptServer
For convenience, we suggest that you set these parameters in the global config file. Note that this example assumes that STARTD_EXPRS is defined previously in your configuration. If not, then you should use the following configuration instead:
  CkptServer = "$(CKPT_SERVER_HOST)"
  STARTD_EXPRS = CkptServer
Now, all machine ClassAds will include a CkptServer attribute, which is the name of the checkpoint server closest to this machine. So, the CkptServer attribute defines the checkpoint server domain of each machine.
To restrict jobs to one checkpoint server domain, we need to modify the jobs' Requirements expression as follows:
Requirements = ((LastCkptServer == TARGET.CkptServer) || (LastCkptServer =?= UNDEFINED))This Requirements expression uses the LastCkptServer attribute in the job's ClassAd, which specifies where the job last wrote a checkpoint, and the CkptServer attribute in the machine ClassAd, which specifies the checkpoint server domain. If the job has not written a checkpoint yet, the LastCkptServer attribute will be UNDEFINED, and the job will be able to execute in any checkpoint server domain. However, once the job performs a checkpoint, LastCkptServer will be defined and the job will be restricted to the checkpoint server domain where it started running.
If instead we want to allow jobs to transfer to other checkpoint server domains when there are no available machines in the current checkpoint server domain, we need to modify the jobs' Rank expression as follows:
Rank = ((LastCkptServer == TARGET.CkptServer) || (LastCkptServer =?= UNDEFINED))This Rank expression will evaluate to 1 for machines in the job's checkpoint server domain and 0 for other machines. So, the job will prefer to run on machines in its checkpoint server domain, but if no such machines are available, the job will run in a new checkpoint server domain.
You can automatically append the checkpoint server domain
Requirements or Rank expressions to all STANDARD
universe jobs submitted in your pool using
APPEND_REQ_STANDARD or APPEND_RANK_STANDARD .
See section 3.3.13 on
page for more details.
To install the PVM contrib module, you must first download the appropriate binary module for whatever platform(s) you plan to use for Condor-PVM. You can find all of the Condor binary modules at http://www.cs.wisc.edu/condor/downloads.
NOTE: The PVM contrib module version must match with your installed Condor version.
Once you have downloaded each module, uncompressed and untarred it, you will be left with a directory that contains a pvm.tar, README and so on. The pvm.tar acts much like the release.tar file for a main release. It contains all the binaries and supporting files you would install in your release directory to enable Condor-PVM:
        sbin/condor_pvmd
        sbin/condor_pvmgs
        sbin/condor_shadow.pvm
        sbin/condor_starter.pvm
You must install these files in the release directory for the platform they were built for. Since these files do not exist in a main release, you can safely untar the pvm.tar directly into the appropriate release directory. You do not need to worry about shutting down Condor, moving files out of the way, and so on. Once the pvm.tar file has been untarred into the release directory, you are done installing the PVM contrib module. You will now be able to submit PVM jobs to your Condor pool.
For complete documentation on using PVM in Condor, see the
section 2.9 on page entitled ``Parallel
Applications in Condor: Condor-PVM''.
The event daemon is an administrative tool for scheduling events in a Condor pool. Every EVENTD_INTERVAL , for each defined event, the event daemon (eventd) computes an estimate of the time required to complete or prepare for the event. If the time required is less than the time between the next interval and the start of the event, the event daemon activates the event.
Currently, this daemon supports SHUTDOWN events, which place machines in the owner state during scheduled times. The eventd causes machines to vacate jobs in an orderly fashion in anticipation of SHUTDOWN events. Scheduling this improves performance, because the machines do not all attempt to checkpoint their jobs at the same time. Instead, the eventd schedules checkpoint transfers according to bandwidth limits defined in its configuration files.
When a SHUTDOWN event is activated, the eventd contacts all startd daemons that match constraints given in the configuration file, and instructs them to shut down. In response to this instruction, the startd on any machine not running a job will immediately transition to the owner state. Any machine currently running a job will continue to run the job, but will not start any new job. The eventd then sends a vacate command to each startd that is currently running a job. Once the job is vacated, the startd transitions to the owner state and remains in this state for the duration of the SHUTDOWN event.
The condor_ eventd must run on a machine with STARTD
ADMINISTRATOR and CONFIG access to your pool.
See section 3.7.5 on
page for full details about IP/host-based
security in Condor.
First, download the condor_ eventd contrib module. Uncompress and untar the file, to have a directory that contains a eventd.tar. The eventd.tar acts much like the release.tar file from a main release. This archive contains the files:
	sbin/condor_eventd
	etc/examples/condor_config.local.eventd
These are all new files, not found in the main release, so you can safely untar the archive directly into your existing release directory. The file condor_ eventd is the eventd binary. The example configuration file is described below.
The file etc/examples/condor_config.local.eventd contains an example configuration. To define events, first set the EVENT_LIST macro. This macro contains a list of macro names which define the individual events. The definition of individual events depends on the type of the event. The format for SHUTDOWN events is
SHUTDOWN DAY TIME DURATION CONSTRAINT
TIME and DURATION are specified in an hours:minutes
format. DAY is a string of days, where M = Monday,
T = Tuesday, W = Wednesday, R = Thursday,
F = Friday, S = Saturday, and U = Sunday. For
example, MTWRFSU would specify that the event occurs daily,
MTWRF would specify that the event occurs only on weekdays, and
SU would specificy that the event occurs only on weekends.
Two options can be specified to change the default behavior of SHUTDOWN events. If _RUNTIME is appended to the SHUTDOWN event specification, the startd shutdown configurations will not be persistent. If a machine reboots or a startd is restarted, the startd will no longer be ``shutdown'' and may transition out of the owner state. This is useful for reboot events, where the startd should leave the shutdown state when the machine reboots. If _STANDARD is appended to the SHUTDOWN event specification, the eventd will only consider standard universe jobs. It will vacate only standard universe jobs and configure machines to run only non-standard universe jobs during the shutdown event. This is also useful for reboot events, where there is no point vacating vanilla or pvm jobs before the machine is rebooted because they are unable to checkpoint. Reboot events are usually listed as SHUTDOWN_RUNTIME_STANDARD .
The following is an example event daemon configuration:
EVENT_LIST	= TestEvent, TestEvent2
TestEvent	= SHUTDOWN_RUNTIME MTWRFSU 2:00 1:00 TestEventConstraint
TestEvent2	= SHUTDOWN MTWRF 14:00 0:30 TestEventConstraint2
TestEventConstraint		= (Arch == "INTEL")
TestEventConstraint2	= (True)
In this example, the TestEvent is a SHUTDOWN_RUNTIME
type event, which
specifies that all machines whose startd ads match the constraint
Arch == "INTEL" should be shutdown for one hour (or until the
startd restarts) starting at 2:00 every Wednesday.
TestEvent2 is a SHUTDOWN type event, which specifies
that all machines should be shutdown for 30 minutes starting at
14:00 every Friday.
The bandwidth limits used in the eventd's schedule are specified in the file indicated by the EVENTD_CAPACITY_INFO parameter, and any network routing information required to implement those limits is specified in the file indicated by the EVENTD_ROUTING_INFO parameter. The EVENTD_CAPACITY_INFO file has the same format as the NETWORK_CAPACITY_INFO file, described in section 3.10.9. The EVENTD_ROUTING_INFO file has the same format as the NETWORK_ROUTING_INFO file, described in section 3.10.9.
Note that the DAEMON_LIST macro (described in section 3.3.7) is defined in the section of settings you may want to customize. If you want the event daemon managed by the condor_ master, the DAEMON_LIST entry must contain both MASTER and EVENTD. Verify that this macro is set to run the correct daemons on this machine. By default, the list also includes SCHEDD and STARTD.
See section 3.3.17 on
page for a description of
optional event daemon parameters.
To start an event daemon once it is configured to run on a given
machine, restart Condor on that given machine to enable
the condor_ master to notice the new configuration.
Send a condor_ restart command from any machine
with administrator access to your pool.
See section 3.7.5 on
page for full details about IP/host-based
security in Condor.
To install the Condor-G contrib module, please see the complete
instructions given in
section 5.3.2
on page .