Definition
An image is composed both of:-
A function
ima : ⎧
⎨
⎩Site → Value p ↦ ima(p) - A site set, also called the "domain".
Possible image types
Here is a short list of the main/usual image types you may want to use with
Olena:
| Name | Description |
| image1d | 1D image |
| image2d | 2D image |
| image3d | 3D image |
| flat_image | Constant value image |
| image_if | Image defined by a function |
Possible value types
Every image type must take its type of value as parameter. The value type can be one of the builtins one:
- bool
- char
- unsigned
- int
- short
- long
- float
- double
Other data types are also available:
| Value type | underlying data type |
| float01_8 | unsigned long |
| float01_16 | unsigned long |
| float01_f | float |
| gl8 | unsigned char |
| gl16 | unsigned short |
| glf | float |
| hsi_d | double |
| hsi_f | float |
| int_s8 | char |
| int_s16 | short |
| int_s32 | int |
| int_u8 | unsigned char |
| int_u16 | unsigned short |
| int_u32 | unsigned int |
| rgb16 | mln::algebra::vec<unsigned short> |
| rgb8 | mln::algebra::vec<unsigned char> |
All these types are available in mln/value and accessible in the mln::value namespace. Most of the time, the name of the header which must be included to use one of these data types is actually “type_name.hh". For instance, for rgb8 the header will be rgb8.hh.
Domain
The site set contains the sites which compose the image. Sites are based on a grid so the image depends on that grid as well. It means that a 2D images can only be defined by sites based on a 2D grid. Likewise, an image2d will always have its bouding box defined by a box2d.Being defined on a grid means that the image can be defined anywhere. For instance, defining a 2D image with a box2d starting from point (-20, -20) to (-3, 5) is completely valid.
The following example shows that the definition domain and the site set are exactly equivalent.
  // Define a box2d from (-2,-3) to (3,5).
  box2d b = make::box2d(-2,-3, 3,5);
  // Initialize an image with b as domain.
  image2d<int> ima(b);

  std::cout << "b = " << b << std::endl;
  std::cout << "domain = " << ima.domain() << std::endl;
b = [(-2,-3)..(3,5)]
domain = [(-2,-3)..(3,5)]
To know if a site belongs to an image domain or not, a method “has()” is available.
  // Create an image on a 2D box
  // with 10 columns and 10 rows.
  image2d<bool> ima(make::box2d(10, 10));

  mln_site_(image2d<bool>) p1(20, 20);
  mln_site_(image2d<bool>) p2(3, 3);

  std::cout << "has(p1)? "
            << (ima.has(p1) ? "true" : "false")
            << std::endl;

  std::cout << "has(p2)? "
            << (ima.has(p2) ? "true" : "false")
            << std::endl;
Since the notion of site is independent from the image it applies on, we can form expressions where a site passed to several images:
  point2d p(9,9);

  // At (9, 9), both values change.
  ima1(p) = 'M';
  ima2(p) = 'W';

  bool b = (ima1(p) == ima2(p));
  std::cout << (b ? "True" : "False") << std::endl;
False
Border and extension
Olena provides extension mechanisms for the image domain. In the library, both the concept of border and of extension can be encountered. These concepts are useful in many algorithms and can avoid costly tests while working with sites located on image edges.Image border
A border is a finite extension provided to a basic image type, such as image2d. By default, every image is created with a border. The default width is defined through the global variable border::thickness defined in mln/border/thickness.hh. Since this is a variable, it can be changed as shown in the following example.
  bool vals[3][3] = { { 0, 1, 1 },
                      { 1, 0, 0 },
                      { 1, 1, 0 } };

  image2d<bool> ima_def = make::image(vals);
  border::fill(ima_def, false);
  debug::println_with_border(ima_def);

  std::cout << "===========" << std::endl << std::endl;

  border::thickness = 0;
  image2d<bool> ima_bt0 = make::image(vals);
  debug::println_with_border(ima_bt0);
Output:
- - - - - - - - -
- - - - - - - - -
- - - - - - - - -
- - - - | | - - -
- - - | - - - - -
- - - | | - - - -
- - - - - - - - -
- - - - - - - - -
- - - - - - - - -

===========

- | |
| - -
| | -
It is important to note that to display the border in the ouput, we use a special debug function, debug::println_with_border. Indeed, the border and the extension are considered as part of an image only in the algorithms. They are ignored while saving or printing an image.
Some operations can be performed on the border. The functions are located in
mln/border.
| Routine | Description |
| adjust | Increase the border thickness if it is inferior to a minimum. |
| duplicate | Assign the border with the duplicate of the edges of this image. |
| equalize | Equalize the border of two images so that their size is equal and is at least a minimum size. |
| fill | Fill the border with a given value. |
| find | Find the border thickness of an image. |
| get | Get the border thickness of an image. |
| mirror | Fills border using nearer pixels with a mirroring effect. |
| resize | Set image border to a specific size. |
Generality on image extension
On morphed images, described in section imamorphed , the border concept does not exist and is generalized to the extension concept. A simple example of a morphed image is a sub-image. A sub image does not have border nor extension by default. Thanks to mln/core/routine/extend.hh, an extension can be defined through a function. This means that the extension can be infinite. Another point is that an image can be used as extension. For instance, in the case of a sub-image, you may be interested in extending the sub-image with the image itself.
The extension supports the following operations. These functions are located in
mln/extension.
| Routine | Description |
| adjust | Adjust the extension given a structural element. |
| adjust_duplicate | Adjust the size of the extension given a structural element and duplicate the image inner boundary. |
| adjust_fill | Adjust the size of the extension given a structural element and fill it with a value. |
| duplicate | Duplicate the values of the image inner boundary in the extension. |
| fill | Fill the extension with a given value. |
In order to extend an image, a routine extend is available in mln/core/routine/extend.hh. The routine extended_to may also help during debug. It allows to extend the image domain to a larger one. The values associated to the new sites comes from the extension.
Different extensions
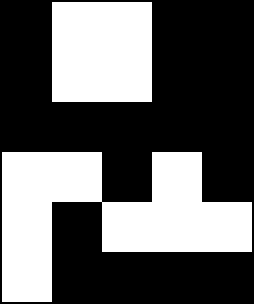
Let’s say we have want to extract a sub domain from an image. In the following example, ima_roi holds several small rectangles from the original image.
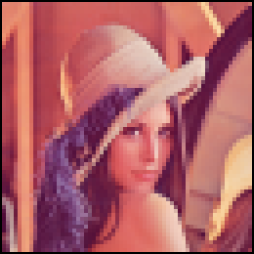
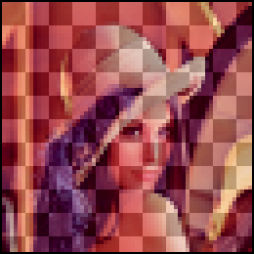
  image2d<rgb8> lena;
  io::ppm::load(lena, MLN_IMG_DIR "/small.ppm");
  box2d bbox_enlarged = lena.domain();
  bbox_enlarged.enlarge(border::thickness);
  mln_VAR(ima_roi, lena | fun::p2b::big_chess<box2d>(lena.domain(), 10));
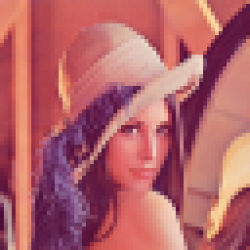
| → |
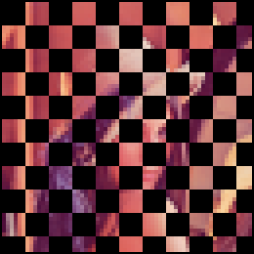
|
| lena | ima_roi (black color means the sites are not included in the domain) |
Then, we may extend this sub image with one of the three following extension type.
Extension with a value
Let’s extend with the value literal::blue.
mln_VAR(ext_with_val, extended_to(extend(ima_roi, literal::blue), bbox_enlarged));
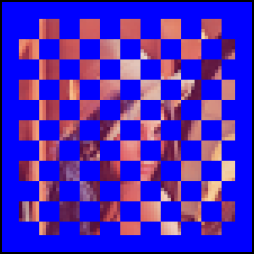
Note the use of the extended_to() routine. We used a larger bbox to extend the image domain. That is the reason why the image is surrounded by the extension value, blue.
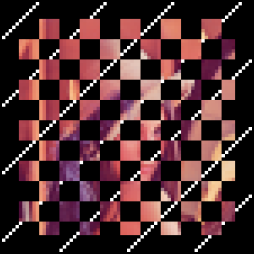
Extension with a function
Let’s use the following function:
namespace mln
{

  struct my_ext : public Function_v2v<my_ext>
  {

    typedef value::rgb8 result;

    value::rgb8 operator()(const point2d& p) const
    {
      if ((p.row() + p.col()) % 20)
        return literal::black;
      return literal::white;
    }

  };

} // end of namespace mln
mln_VAR(ext_with_fun, extended_to(extend(ima_roi, my_ext()), bbox_enlarged));
Extension with an image
Let’s extend with the original image, lena.
mln_VAR(ext_with_ima, extend(ima_roi, lena));
|
|
| ext_with_ima, the extended image. | The actual data in the domain (light) with its extension (dark) |
IMPORTANT NOTE
Many times, you may want to check if a site is part of the image before applying a treatment. All images provide a method “has(Site)” which can return this information. Be careful though, calling has() on the image returns “true” if the given site is part of the domain OR the the extension/border. All algorithms in Olena call that method which means that all the algorithms take in consideration the extension/border if it exists. The default border thickness is set to 3 as shown by the following example.
  // Default border size is set to 0.

  // Image defined on a box2d from
  // (0, 0) to (2, 2)
  image2d<int> ima1(2, 3);

  std::cout << "ima1.has(0, 0) : "
            << ima1.has(point2d(0, 0)) << std::endl;

  std::cout << "ima1.has(-3, 0) : "
            << ima1.has(point2d(-3, 0)) << std::endl;

  std::cout << "ima1.has(2, 5) : "
            << ima1.has(point2d(2, 5)) << std::endl;

  std::cout << "=========" << std::endl;

  // Set default border size to 0.
  border::thickness = 0;

  // Image defined on a box2d from
  // (0, 0) to (2, 2)
  image2d<int> ima2(2, 3);

  std::cout << "ima2.has(0, 0) : "
            << ima2.has(point2d(0, 0)) << std::endl;

  std::cout << "ima2.has(-3, 0) : "
            << ima2.has(point2d(-3, 0)) << std::endl;

  std::cout << "ima2.has(2, 5) : "
            << ima2.has(point2d(2, 5)) << std::endl;
Output:
ima1.has(0, 0) : 1
ima1.has(-3, 0) : 1
ima1.has(2, 5) : 1
=========
ima2.has(0, 0) : 1
ima2.has(-3, 0) : 0
ima2.has(2, 5) : 0
Most of the time, this is the good behavior. For instance, if a rotation is applied to an image, sites which were not previously in the domain will be part of it. Thanks to the extension/border, these sites will be associated to the value of the extension/border.
In the following example, the extension is set to a constant color yellow. It means that whatever the new sites computed through the rotation, it will be part of the image and a value will be available. Site which were previously in the extension/border, will be associated to yellow in the output image.
  border::thickness = 30;

  // Declare the image to be rotated.
  image2d<value::rgb8> ima1_(220, 220);
  data::fill(ima1_, literal::cyan);
  border::fill(ima1_, literal::yellow);
  // Set an infinite extension.
  mln_VAR(ima1, extend(ima1_, pw::cst(literal::yellow)));

  // Declare the output image.
  image2d<value::rgb8> ima2(220, 220);
  data::fill(ima2, literal::cyan);
  border::fill(ima2, literal::yellow);

  box2d extended_domain= ima1.domain();
  extended_domain.enlarge(border::thickness);

  // Draw the domain bounding box
  draw::box(ima1, geom::bbox(ima1_), literal::red);
  // Save the image, including its border.
  doc::ppmsave(ima1 | extended_domain, "ima2d-rot");

  // Define and apply a point-wise rotation
  fun::x2x::rotation<2,float> rot1(0.5, literal::zero);
  image2d<value::rgb8>::fwd_piter p(ima1.domain());
  for_all(p)
  {
    algebra::vec<2,float> pv = p.to_site().to_vec();
    algebra::vec<2,float> v = rot1.inv()(pv);
    ima2(p) = ima1(v);
  }

  draw::box(ima2, ima2.bbox(), literal::red);
  doc::ppmsave(extended_to(ima2, extended_domain), "ima2d-rot");
Output:
|
|
| ima1 and its border before rotation (left) and ima2 and its border after rotation (right). | |
Sometimes taking the domain in consideration may not be the expected behavior. If you do not want to use the extension/border for a specific routine, simply restrict the image to its domain.
my_routine(ima | ima.domain());
Note that:
Interface
| Return Type | Name | Arguments | Const | Comments |
| I::pvset | domain | - | X | |
| const Value& | operator() | const point& p | X | Used for reading. |
| Value& | operator() | const point& p | - | Used for writing. |
| bool | has | const Point& p | X | |
| bool | has_data | - | X | Returns true if the domain is defined. |
| site_id | id | - | X | Return the Id of the underlying shared data. |
| I::vset | destination | - | X | Value set of all the possible site values in this Image. |
| site_set | bbox | - | - | Returns the bounding box of the domain. |
| site_set | bbox_large | - | - | Returns the bouding box of the domain and the extended domain. |
Load and save images
Currently, Olena supports the following input image formats:
- PBM
- PFM
- PGM
- PNM
- PPM
This support is provided through two headers for each type, save.hh and load.hh. They are located in mln/io/<image-format>/.
Once the right header is included, the image can be loaded:
  image2d<bool> ima;
  io::pbm::load(ima, MLN_DOC_DIR "/img/small.pbm");
Note that each format is associated to specific image value types:
| hline Format | Value type |
| PBM | bool |
| PFM | float, double, float01_* |
| PGM | unsigned, long, int, int_u*, gl* |
| PNM | See PGM, PBM and PPM |
| PPM | rgb* |
io::pbm::save(ima, MLN_DOC_DIR "/figures/ima_save.pbm");
Create an image
Loading an image is not mandatory, an image can be created from scratch. There are two possibilites to do so:
  // Build an empty image;
  image2d<value::int_u8> img1a;

  // Build an image with 2 rows
  // and 3 columns sites
  image2d<value::int_u8> img1b(box2d(2, 3));
  image2d<value::int_u8> img1c(2, 3);
img1a has no data and its definition domain is still unset. We do
not know yet the number of sites it contains. However, it is really useful to
have such an "empty image" because it is a placeholder for the result of some
processing, or another image. Trying to access the site value from an empty
image leads to an error at run-time.
img1b is defined on a domain but does not have data yet.
An image can also be created and initialized at the same time:
  bool vals[6][5] = {
      {0, 1, 1, 0, 0},
      {0, 1, 1, 0, 0},
      {0, 0, 0, 0, 0},
      {1, 1, 0, 1, 0},
      {1, 0, 1, 1, 1},
      {1, 0, 0, 0, 0}
  };
  image2d<bool> ima = make::image(vals);
Sometimes, you may want to initialize an image from another one:
  image2d<value::int_u8> img2a(2, 3);
  image2d<value::int_u8> img2b;

  initialize(img2b, img2a);
  data::fill(img2b, img2a);
Access and modify values
There are several ways to access/modify an image “ima”:
- opt::at(ima, x, y, …)
- ima(Site)
Most of the time, images can be modified and these two methods can be used both to read a value and modify it. Both methods are equivalent.
  box2d b(2,3);
  image2d<value::int_u8> ima(b);

  // On image2d, Site <=> point2d
  point2d p(1, 2);

  // Associate '9' as value for the site/point2d (1,2).
  // The value is returned by reference and can be changed.
  opt::at(ima, 1,2) = 9;
  std::cout << "opt::at(ima, 1,2) = " << opt::at(ima, 1,2)
            << std::endl;
  std::cout << "ima(p) = " << ima(p) << std::endl;

  std::cout << "---" << std::endl;


  // Associate '2' as value for the site/point2d (1,2).
  // The value is returned by reference
  // and can be changed as well.
  ima(p) = 2;
  std::cout << "opt::at(ima, 1,2) = " << opt::at(ima, 1,2)
            << std::endl;
  std::cout << "ima(p) = " << ima(p) << std::endl;
opt::at(ima, 1,2) = 9
ima(p) = 9
---
opt::at(ima, 1,2) = 2
ima(p) = 2
Usually, you will want to use the functional way, “ima(Site)”, more particularly while iterating over all the sites through an iterator. This use case will be detailed further in section Iterators .
Image size
Most typical image types owns special methods to retrieve the image size.| Image type | Methods |
| image1d | length() |
| image2d | ncols(), nrows() |
| image3d | ncols(), nrows(), nslis() |
If you need a more generic way to get the size, you can use the routines provided in mln/geom in the following files:
- ncols.hh
- nrows.hh
- nslis.hh
  image2d<int> ima(make::box2d(0,0, 10,12));

  std::cout << "nrows = " << ima.nrows()
            << " - "
            << "ncols = " << ima.ncols()
            << std::endl;